-- PedroRio - 07 Mar 2011
 Figure DeployEar.1 - Export to EAR Wizard Step 1(XEO Studio)
Depicted in figure DeployEar.1 (numered from 1 to 7) are the options when exporting a project to EAR. The options have the following meaning:
Figure DeployEar.1 - Export to EAR Wizard Step 1(XEO Studio)
Depicted in figure DeployEar.1 (numered from 1 to 7) are the options when exporting a project to EAR. The options have the following meaning:  Figure DeployEar.2 - Export to EAR Wizard Step 2 (XEO Studio)
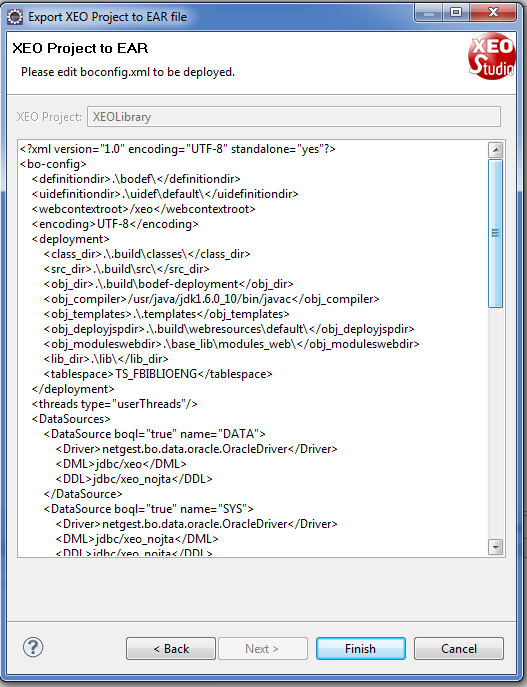
In figure DeployEar.2, step 2 of the EAR exporting process you're presented with an interface to customize the boconfig.xml file for the current export ( profile?). When you press finish, XEO Studio will generate the EAR for you and place it in the directory you chose.
Figure DeployEar.2 - Export to EAR Wizard Step 2 (XEO Studio)
In figure DeployEar.2, step 2 of the EAR exporting process you're presented with an interface to customize the boconfig.xml file for the current export ( profile?). When you press finish, XEO Studio will generate the EAR for you and place it in the directory you chose.
Deploying a XEO Application to a J2EE Server (EAR)
The final step in XEO Development is deploying the application to a J2EE Server (JBoss, WebLogic, etc..). XEO Studio provides built-in support to development using Oracle's OC4J and JBoss, but a XEO Application can be deployed to any compatible J2EE Server, with the following steps.Exporting the XEO Application as an EAR
The first step to deploy a XEO Application is generating an EAR ( Enterprise Archive). XEO Studio provides a wizard to export a current project to an EAR file. In order to export a XEO project to an EAR file you need to select the "File" menu and choose "Export", find the "XEO Studio" folder and choose the "Export Project to EAR" option, which in turn will open a new window depicted in figure DeployEar.1.
Figure DeployEar.1 - Export to EAR Wizard Step 1(XEO Studio)
Depicted in figure DeployEar.1 (numered from 1 to 7) are the options when exporting a project to EAR. The options have the following meaning: - The Export Profile, you can reuse an existing profile or create a new one. An export profile basically saves the selected options for later reuse.
- The name of the profile (which will appear in "Use an existing profile" combo box.
- The name of the .EAR file to be generated
- The J2EE server to which the EAR will be deployed (currently there's support for JBOSS and OC4J)
- The destination folder where the EAR will be created (must have write permission, naturally)
- If an ant script with the operations to create the EAR file should be saved for later reuse
- If the XEO Application should be rebuilt (XEO Builder invoked) before creating the EAR
Figure DeployEar.2 - Export to EAR Wizard Step 2 (XEO Studio)
In figure DeployEar.2, step 2 of the EAR exporting process you're presented with an interface to customize the boconfig.xml file for the current export ( profile?). When you press finish, XEO Studio will generate the EAR for you and place it in the directory you chose.
Two different boConfig (development and production)?
One common scenario is to have a boconfig.xml file that has settings for local development, but when an EAR is created with the application those settings no longer apply, as such, you'll probably have a different boconfig.xml file for when you want to deploy your application. One way to do this is by having a boconfig-PRODUCTION.xml file in your project (which won't be used in development because the file XEO picks up has to be named boconfig.xml) and having an ant file (option 6 when exporting) that generates the EAR with includes the following:<copy todir='${basedir}/.deploytmp/ear/'>
<fileset dir="${basedir}" includes='boconfig-PRODUCTION.xml' />
<mapper type="merge" to="boconfig.xml" />
</copy>
Instead of the default ant file, which includes the following:
<copy todir='${basedir}/.deploytmp/ear/'>
        <!-- Remaing code omitted for clarity -->
        <fileset dir="${basedir}/.xeometasettings/.eardefs/ApplicationProfile/" includes='boconfig.xml' />
</copy>
Configuring the J2EE Server (example for JBOSS)
Having the EAR file generated you need only to configure the datasources for the

| I | Attachment | Action | Size | Date | Who | Comment |
|---|---|---|---|---|---|---|
| |
EarWizard.png | manage | 39.9 K | 2011-03-07 - 10:01 | PedroRio | |
| |
EarWizardPart2.png | manage | 43.7 K | 2011-03-07 - 10:11 | PedroRio |
XEO Primer
- - Instalation
- - Introduction
- - Concepts
- - Architecture
- - XEO Library
- - Deploy to EAR
- - PreferenceStore
- - XEO Model Reference
- - Security
- - Java API
- - BOL
- - XEOQL (BOQL)
- - Administrating
- - Background Tasks
- - boConfig.xml
- - Web.xml
- - Known Issues
- - XEO Flags
- - Web Components
- - Java Samples
- - Custom Components
- - Component Plugins
- - Internationalization
- - Viewer Events
- - Value Change Listeners
- - XUIServlet
- - XeoLocalization
- - XvwTemplates
No permission to view TWiki.WebTopBar