-- PedroRio - 21 Feb 2011
beforePreRender - Method invoked before the preRender method of the component and each time the component is added to the component tree. It's only invoked once for each instance of the viewer (for each component that has the plugin, of course). afterPreRender - Method invoked after the preRender method of the component and each time the component is added to the component tree. It's only invoked once for each instance of the viewer (for each component that has the plugin, of course). There are two additional methods that allow you to interact with the component's behavior. replaceComponent - This method is used to completely replace the component with another component wasStateChanged - This method is invoked by the framework to determine whether the component should be updated client-side (browser). If it returns true the component will be updated on the client and if it returns false it will let the component decide for itself.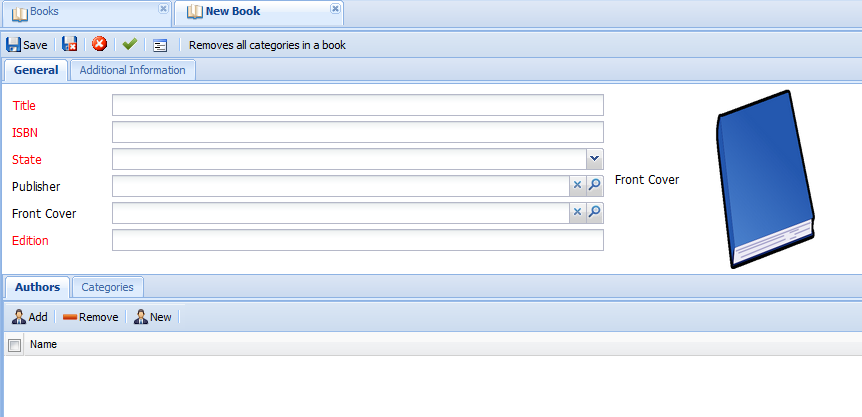 Figure CompPlug.1 - LIB_Book Object Model Edit Viewer
The component you're about to create is really simple. It will dynamically create a new row with a new attribute to show the "summary" of the book right bellow the edition attribute. The final result is depicted in figure CompPlug.2.
Figure CompPlug.1 - LIB_Book Object Model Edit Viewer
The component you're about to create is really simple. It will dynamically create a new row with a new attribute to show the "summary" of the book right bellow the edition attribute. The final result is depicted in figure CompPlug.2.
 Figure CompPlug.2 - Lib_Book XEO Model Edit Viewer with Plugin to display the book's summary.
In this example, adding the new "summary" attribute won't be very creative. The new attribute will always be added (for simplicity's sake, but you could add rules that only under certain conditions would show the new attribute). In order to achieve the result, you'll implement the afterInitComponent method (which, recall, will be executed after the init method of the component ,which, in turn, initializes the component). You want to do this because by the time the afterInitComponent method is invoked all the child Row elements were already added to the Rows component (where you placed the PlugIn) and so you can manipulate them.
The XEO Library example did not have a special bean (other than the default XEOEditBean) associated to the LIB_Book edit viewer, so you must first create the bean in the source of the project and declare that bean in the viewer xml definition. Afterwards you can add the following code to the bean.
Figure CompPlug.2 - Lib_Book XEO Model Edit Viewer with Plugin to display the book's summary.
In this example, adding the new "summary" attribute won't be very creative. The new attribute will always be added (for simplicity's sake, but you could add rules that only under certain conditions would show the new attribute). In order to achieve the result, you'll implement the afterInitComponent method (which, recall, will be executed after the init method of the component ,which, in turn, initializes the component). You want to do this because by the time the afterInitComponent method is invoked all the child Row elements were already added to the Rows component (where you placed the PlugIn) and so you can manipulate them.
The XEO Library example did not have a special bean (other than the default XEOEditBean) associated to the LIB_Book edit viewer, so you must first create the bean in the source of the project and declare that bean in the viewer xml definition. Afterwards you can add the following code to the bean.
XEO Web Components - Plugins
XEO provides a set of predefined components which can be customized through their properties, but, at first glance, their behavior cannot be changed. To provide a solution to extend existing components XEO provides the notion of a Web Component Plugin. A Web Component Plugin allows you to change the default behavior of a component by "injecting code" at certain points of the execution of the component's methods. Every component that extends from XUIComponentBase has a plugIn property which can be configured with a bean method that will return an instance of a class that represents the plugin. That method must return an instance of a class that extends the abstract class netgest.bo.xwc.framework.XUIComponentPlugIn. By extending that abstract class you can interact with the component at various stages of its processing in the following methods:Plugin Methods
beforeInitComponent - Method invoked prior to the initComponent method of the component and each time the component is added to the component tree. It's only invoked once for each instance of the viewer (for each component that has the plugin, that is) afterInitComponent - Method invoked after the initComponent method of the component and each time the component is added to the component tree.It's only invoked once for each instance of the viewer (for each component that has the plugin, of course)beforePreRender - Method invoked before the preRender method of the component and each time the component is added to the component tree. It's only invoked once for each instance of the viewer (for each component that has the plugin, of course). afterPreRender - Method invoked after the preRender method of the component and each time the component is added to the component tree. It's only invoked once for each instance of the viewer (for each component that has the plugin, of course). There are two additional methods that allow you to interact with the component's behavior. replaceComponent - This method is used to completely replace the component with another component wasStateChanged - This method is invoked by the framework to determine whether the component should be updated client-side (browser). If it returns true the component will be updated on the client and if it returns false it will let the component decide for itself.
Example
In order to use a plugin, you must fill the "plugIn" property of the respective component, like the following:<xeo:list>
<xvw:columns plugIn='#{viewBean.columnsPlugIn}'></xvw:columns>
</xeo:list>
And in the respective bean, the following:
    //Property to keep the Columns Plugin
    private ColumnsPlugIn columnsPlugIn = new ColumnsPlugIn();

   //Property to retrieve the plugin
    public XUIComponentPugIn getColumnsPlugIn() {
        return columnsPlugIn;
    }

    /**
    *  Class that replaces the current columns component (empty per the xml defniition) with
    *  one that has two columns (username and name) each with a width of 200.
    *
    */
    public static class ColumnsPlugIn extends XUIComponentPugIn {

        @Override
        public void afterInitComponent() {
            Columns c = new Columns();

            replaceComponent( c );

            WebXEO.ColumnAttribute col1 = new WebXEO.ColumnAttribute();
            col1.setWidth("200");
            col1.setDataField( "username" );

            WebXEO.ColumnAttribute col2 = new WebXEO.ColumnAttribute();
            col2.setWidth("200");
            col2.setDataField( "name" );

            c.getChildren().add( col1 );
            c.getChildren().add( col2 );
        }
    }
This previous example completely replaces the (non-existing) columns with new ones, but one could simply add new columns to the existing ones, by using the following code:
//Create the new column
WebXEO.ColumnAttribute ca = new WebXEO.ColumnAttribute();
ca.setDataField("username");
ca.setWidth("200");
//Retrieve the list of child elements and add a new column
getComponent().getChildren().add(ca);
Potentially you could create interesting things such as generating forms dynamically. To illustrate that you're going to update the XEO Library edit viewer for the LIB_Book XEO Model to use a plugin. The edit viewer for the LIB_Book Object Model is depicted in figure CompPlug.1
Figure CompPlug.1 - LIB_Book Object Model Edit Viewer
The component you're about to create is really simple. It will dynamically create a new row with a new attribute to show the "summary" of the book right bellow the edition attribute. The final result is depicted in figure CompPlug.2.
Figure CompPlug.2 - Lib_Book XEO Model Edit Viewer with Plugin to display the book's summary.
In this example, adding the new "summary" attribute won't be very creative. The new attribute will always be added (for simplicity's sake, but you could add rules that only under certain conditions would show the new attribute). In order to achieve the result, you'll implement the afterInitComponent method (which, recall, will be executed after the init method of the component ,which, in turn, initializes the component). You want to do this because by the time the afterInitComponent method is invoked all the child Row elements were already added to the Rows component (where you placed the PlugIn) and so you can manipulate them.
The XEO Library example did not have a special bean (other than the default XEOEditBean) associated to the LIB_Book edit viewer, so you must first create the bean in the source of the project and declare that bean in the viewer xml definition. Afterwards you can add the following code to the bean.
private BookFormPlugIn bookFormPlugin = new BookFormPlugIn();

        public XUIComponentPlugIn getBookFormPlugIn() {
            return bookFormPlugin;
        }

        public static class BookFormPlugIn extends XUIComponentPlugIn {

            @Override
            public void afterInitComponent(){

                //Retrieve the current component
                Rows rows = (Rows) getComponent();
                //Create a new row and a new cell
                Row newRow = new Row();
                Cell newCell = new Cell();

                //Create the attribute
                Attribute moreInformation = new Attribute();
                moreInformation.setObjectAttribute("summary");
                //Add the components to the chain, cell has attribute has child
                newCell.getChildren().add(moreInformation);
                //Row has Cell as child
                newRow.getChildren().add(newCell);
                //Add the new row to the current rows
                rows.getChildren().add(newRow);
            }


        }
To finish the plugin you just need to declare it in the LIB_Book edit viewer:
<xvw:cell>
     <xvw:rows plugIn='#{viewBean.bookFormPlugIn}'>
        <xvw:row><xvw:cell><xvw:attribute objectAttribute='title' /></xvw:cell></xvw:row>
        <xvw:row><xvw:cell><xvw:attribute objectAttribute='isbn' /></xvw:cell></xvw:row>
        <xvw:row><xvw:cell><xvw:attribute objectAttribute='state' /></xvw:cell></xvw:row>
(...)
With that you're done. Check the result in the browser and see it matches the one in figure CompPlug.2.
_ 

| I | Attachment | Action | Size | Date | Who | Comment |
|---|---|---|---|---|---|---|
| |
LibBookAfterComponent.png | manage | 41.2 K | 2011-02-21 - 16:23 | PedroRio | |
| |
LibBookBeforeComponent.png | manage | 39.0 K | 2011-02-21 - 16:18 | PedroRio |
Topic revision: r7 - 2011-04-04 - NicolauGrosskopf
XEO Primer
- - Instalation
- - Introduction
- - Concepts
- - Architecture
- - XEO Library
- - Deploy to EAR
- - PreferenceStore
- - XEO Model Reference
- - Security
- - Java API
- - BOL
- - XEOQL (BOQL)
- - Administrating
- - Background Tasks
- - boConfig.xml
- - Web.xml
- - Known Issues
- - XEO Flags
- - Web Components
- - Java Samples
- - Custom Components
- - Component Plugins
- - Internationalization
- - Viewer Events
- - Value Change Listeners
- - XUIServlet
- - XeoLocalization
- - XvwTemplates
No permission to view TWiki.WebTopBar