-- PedroRio - 16 Dec 2010
 Figure OM.1 - XEO Package Wizard
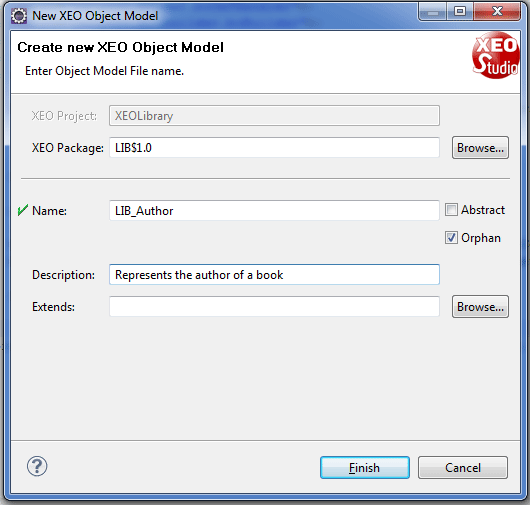
Next we need to use the XEO Object Model wizard, to create the new Object Model. Go to the "File" menu, select "New" and choose "XEO Object Model". In the "XEO Package" field choose the "Lib$1.0" package just created and the "Name" field type "LIB_Author" (in this project, all Object Models will be prefixed with "LIB_"), enter a description of the XEO Object Model and leave all other fields with their default values (see figure OM.2).
Figure OM.1 - XEO Package Wizard
Next we need to use the XEO Object Model wizard, to create the new Object Model. Go to the "File" menu, select "New" and choose "XEO Object Model". In the "XEO Package" field choose the "Lib$1.0" package just created and the "Name" field type "LIB_Author" (in this project, all Object Models will be prefixed with "LIB_"), enter a description of the XEO Object Model and leave all other fields with their default values (see figure OM.2).
 Figure OM.2 - XEO Object Model Wizard
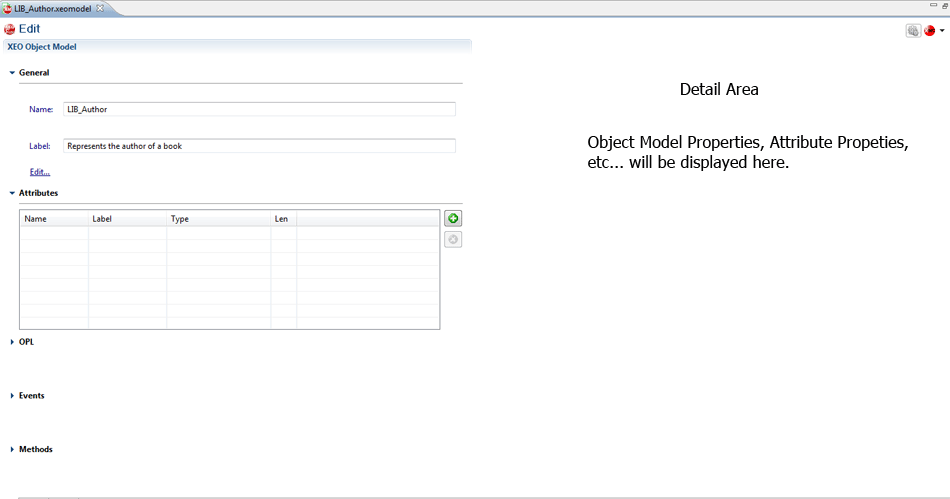
Now, open the Object Model, this will open the Object Model Editor, which has three different views: Edit, Design and Source. Edit is the graphical editor for the XML Language, Design is Eclipse's XML editor, and Source is the XML source code. The Object Model Editor (in design mode) is depicted in figure OM.3. Which is designed as a master-detail interface. The left panel has all the main properties of an Object Model (Model properties, Attributes, Events, OPL, Methods) while the right panel (Detail Area) displays the properties of the given element chosen from the left panel.
Figure OM.2 - XEO Object Model Wizard
Now, open the Object Model, this will open the Object Model Editor, which has three different views: Edit, Design and Source. Edit is the graphical editor for the XML Language, Design is Eclipse's XML editor, and Source is the XML source code. The Object Model Editor (in design mode) is depicted in figure OM.3. Which is designed as a master-detail interface. The left panel has all the main properties of an Object Model (Model properties, Attributes, Events, OPL, Methods) while the right panel (Detail Area) displays the properties of the given element chosen from the left panel.
 Figure OM.3 - XEO Object Model Editor, for the Author
 Figure OM.3a - Editing attribute name
As soon as you save the model, the XEO Builder will kick-in to create the required structures for your Object Model.
Before we dive into the rest of the objects, we want to show you how fast you can start your applications, in the next section called XEO in Action!
Figure OM.3a - Editing attribute name
As soon as you save the model, the XEO Builder will kick-in to create the required structures for your Object Model.
Before we dive into the rest of the objects, we want to show you how fast you can start your applications, in the next section called XEO in Action!


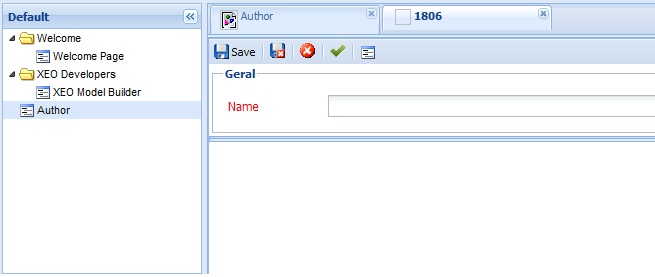
 Figure OM.4d - Edit Viewer for the Author
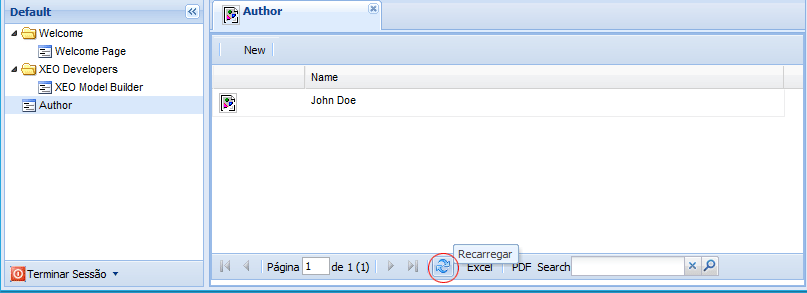
If you write a name, for example "John Doe" and press the "Save and Close" button (The small floppy drive with a with cross in red background, second from the left) you will have created your very first XEO Object instance. In our List viewer the changes are not reflected automatically, but if you press the little refresh button (see red circle in figure OM.4e) the data is refreshed and our author is displayed (figure OM.4e).
Figure OM.4d - Edit Viewer for the Author
If you write a name, for example "John Doe" and press the "Save and Close" button (The small floppy drive with a with cross in red background, second from the left) you will have created your very first XEO Object instance. In our List viewer the changes are not reflected automatically, but if you press the little refresh button (see red circle in figure OM.4e) the data is refreshed and our author is displayed (figure OM.4e).
 Figure OM.4e - List Viewer After Data Reload
Before going back to modelling other entities, we'll just show a quick glimpse of how to add custom behavior to a Model, check the next section.
Figure OM.4e - List Viewer After Data Reload
Before going back to modelling other entities, we'll just show a quick glimpse of how to add custom behavior to a Model, check the next section.
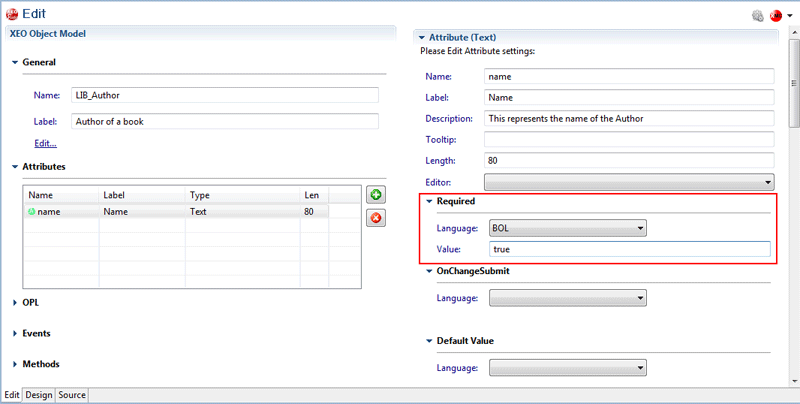
 Figure OM.4f - Adding a requirement condition to the name attribute of Author
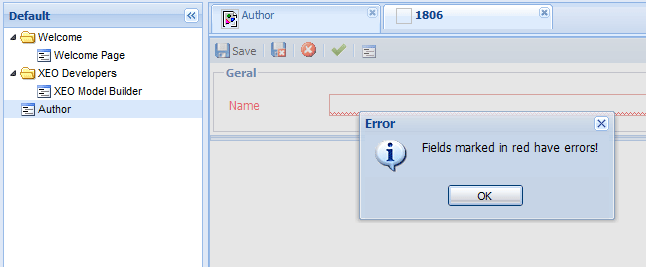
If you now return the Author List Viewer and press the "New" Button, the result will be like the one depicted in figure OM.4g. Since the field is required it should not be possible to save this instance and if you press the "Save" Button, you'll be presented with the screen depicted in figure OM.4h. This section was just to show how easy it is to build these applications using XEO, more to come in the following sections. Figure OM.4g - Author Edit Viewer with Name attribute required
 Figure OM.4h - Error message when saving Author without name
Object Modelling - XEO Library
In this chapter we'll learn how to model the XEO Library entities into XEO Object Models. We'll begin by modelling the simplest entity we have: The author.Modeling an entity to an Object Model - The author
Before that, however, we want to group all XEO Object Models in the same XEO Package, for that we'll use the XEO Package Wizard in XEO Studio. Go to the "File" menu, choose "New" and select "XEO Package". A new window will open to allow you to choose the package name (we'll follow the XEO convention and name it LIB$1.0) and we give it a small description such as "XEO Library Object Models", leaving the Parent Package field blank (we won't use subpackages in the Library project), see figure OM.1 for details.
Figure OM.1 - XEO Package Wizard
Next we need to use the XEO Object Model wizard, to create the new Object Model. Go to the "File" menu, select "New" and choose "XEO Object Model". In the "XEO Package" field choose the "Lib$1.0" package just created and the "Name" field type "LIB_Author" (in this project, all Object Models will be prefixed with "LIB_"), enter a description of the XEO Object Model and leave all other fields with their default values (see figure OM.2).
Figure OM.2 - XEO Object Model Wizard
Now, open the Object Model, this will open the Object Model Editor, which has three different views: Edit, Design and Source. Edit is the graphical editor for the XML Language, Design is Eclipse's XML editor, and Source is the XML source code. The Object Model Editor (in design mode) is depicted in figure OM.3. Which is designed as a master-detail interface. The left panel has all the main properties of an Object Model (Model properties, Attributes, Events, OPL, Methods) while the right panel (Detail Area) displays the properties of the given element chosen from the left panel.
Figure OM.3 - XEO Object Model Editor, for the Author
Creating an Attribute
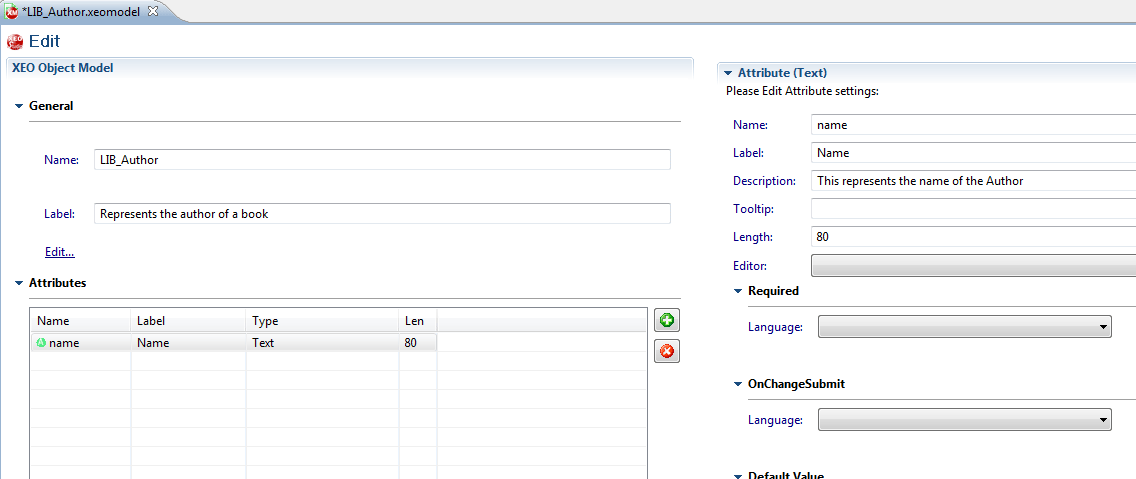
With the LIB_Author Object Model open, let's add an attribute. Back in the XEO Library introduction the author entity was defined as only having one attribute, which was its name. A name will be a textual value, thus, we want to add an "Text" attribute to LIB_Author. Click the "Plus" green button in the Attributes section of the left panel and from the list choose "Text". This will add the attribute to the list and open the detail panel with the newly created attribute. In the "name" field, write "name" and in the label "Name" (Or "Author Name") this is the value that'll be used in edit viewers. You can write a description (documentation) of the attribute and set the length with a maximum of 80 characters (see figure OM.3a). The "name" field is the name which we'll use when dealing with the Java API when interacting with this particular attribute.
Figure OM.3a - Editing attribute name
As soon as you save the model, the XEO Builder will kick-in to create the required structures for your Object Model.
Before we dive into the rest of the objects, we want to show you how fast you can start your applications, in the next section called XEO in Action!
XEO in Action - A quick overview!
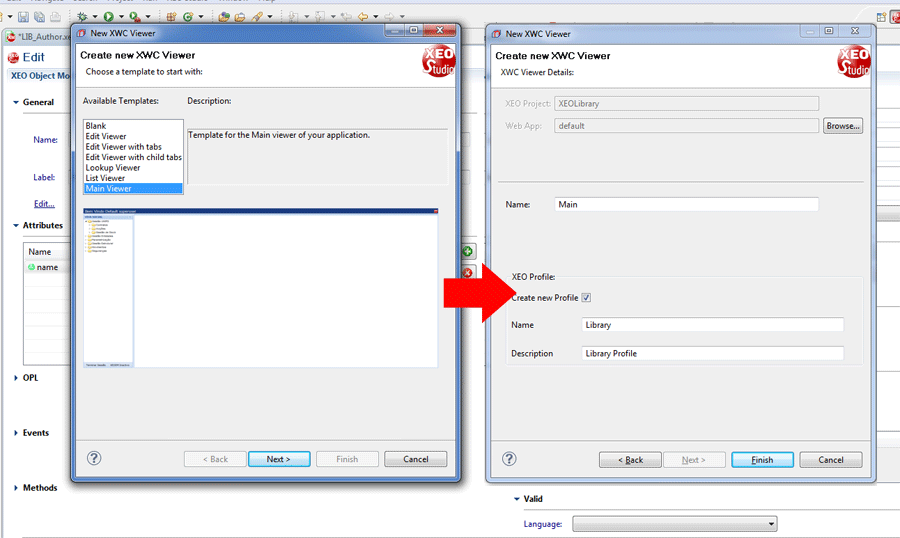
With what we have so far, we're going to create a Main viewer to our application that'll allow us to list every author in our application as well create/edit new ones. First we must create the Main viewer, by going to the "File" menu, press "New" and choose "XEO Web Viewer"; from the list that appears, choose "Main Viewer" and press Next", in the next window type "Main" in the Name field and leave the "Create new Profile" box checked fill with "Library" as the profile name and "Library Profile" as the description (see the procedure depicted in figure OM.4, bellow). This will create our Main viewer and create a XEO Profile (which we'll use later for other purposes). Figure OM.4 - Create new Main Viewer and Profile
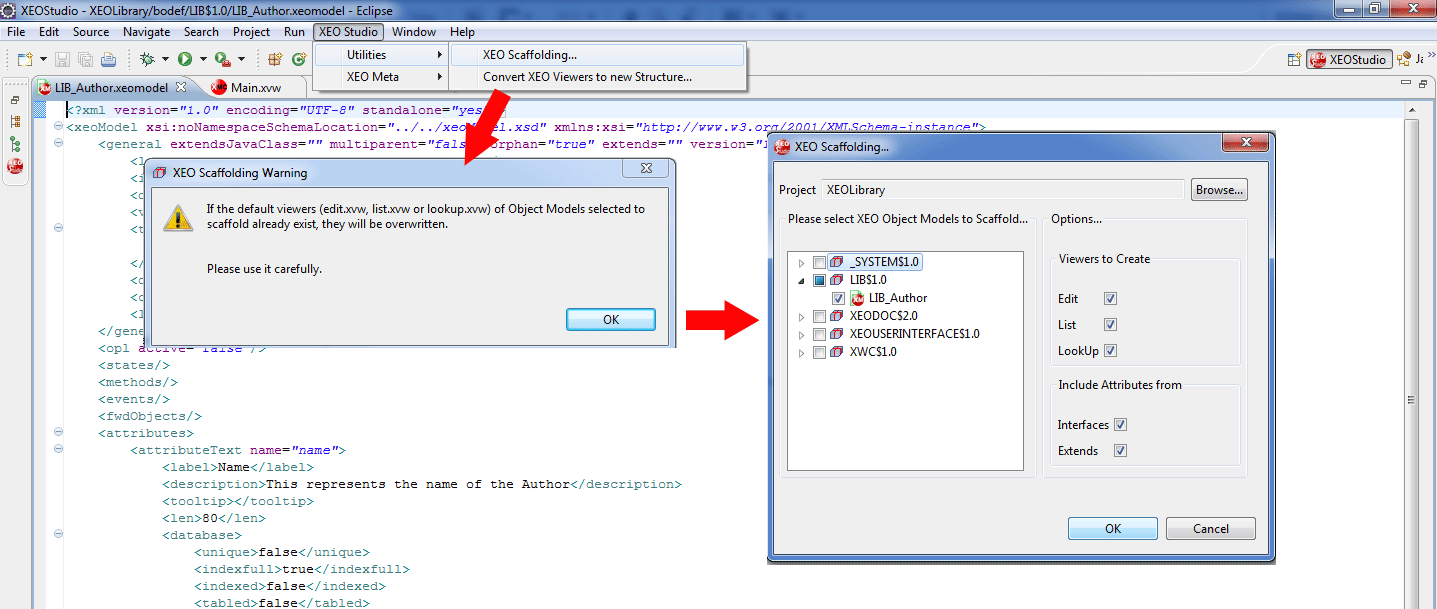
Whith this step we now have a MainViewer, only requiring a List and Edit Viewer to be able to list author instances and create new ones (as well as edit existing ones). We'll dwelve in great detail how to create List/EDit Viewers later in the documentation, for now we'll use a usefull feature in XEO Studio to create a proptype list/edit/lookup viewer, based on the Object Model of LIB_Author. This feature is called XEO Scaffolding and it will basically analyze Object Models and create viewers accordingly; XEO Scaffolding is a way to speed up development by quickly generating viewers based on the Object Model, but beware that Scaffolding re-writes the viewers each time it's executed so its main use is to quickly generate mock-up viewers and then those viewers we'll be customized with whatever needs you have.
Figure OM.4a - Scaffolding XEO Viewers for the LIB_Author Object Model.
Go back to the web browser (if you're still logged in, terminate session by pressing the logout button in the lower left corner of the main viewer)
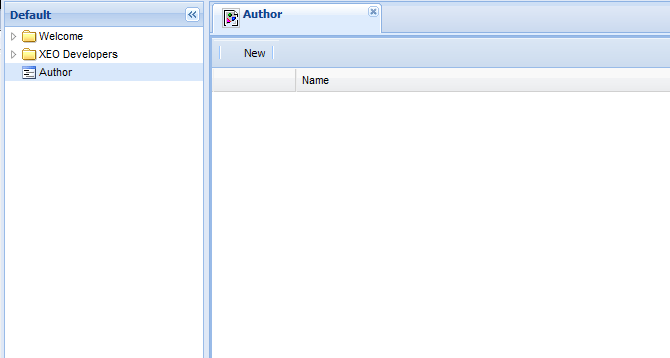
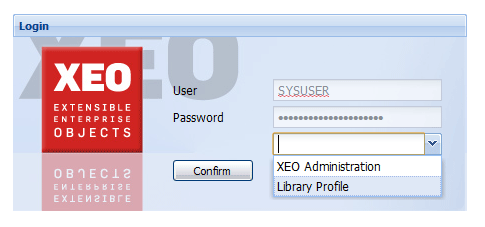
and again go to the Login.xvw page, enter SYSUSER/ABC and confirm. Notice that you'll not be taken to the "Main_admin.xvw" page imediattly but a combox will appear (depicted in figure OM.4b), allowing you to choose your profile (more in this later, but remember that while generating the Main_Library viewer we checked the "Create new Profile" option). Choose the "Library Profile" and confirm again, in this way you'll be taken to the Main.xvw viewer, in which you'll see few entries one of them being the "Author" entry (last element of the tree) as depicted in figure OM.4c. If you click on the "Author" entry a new tab will open with the (empty) list of Authors in our application (this uses the List viewer created through scaffolding earlier). A new button also exists to allow creating a new instance of an author (using the Edit viewer created through the scaffolding as well).
Figure OM.4b - Profiles in Login Page
Figure OM.4c - Main viewer with author entry and author viewer list open
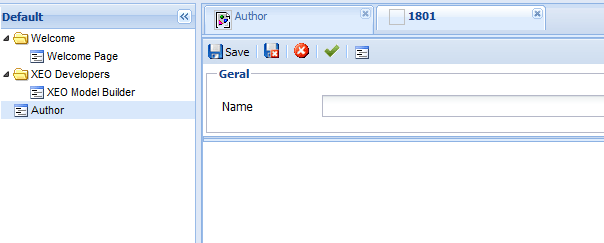
Press the "New" button and a new tab will open. This tab will have the fields to edit (in this case, create a new one) an instance of an author and has a toolbar to deal with common operations with a specific instance (save, save and close the tab, delete the current instance, validate the fields and check properties). You'll notice that in tab titles there are some broken image links and the new author tab has a number of the title (figure OM.4d); those values can be changed and the images can be set so that a nice icon appears in the tab title (we'll see that later in the documentation).
Figure OM.4e - List Viewer After Data Reload
Before going back to modelling other entities, we'll just show a quick glimpse of how to add custom behavior to a Model, check the next section.
XEO in Action! - Simple Behavior customization
Just to show you some of things XEO can do to help you create your application, we'll now make that the name of the Author is a required field (i.e. you cannot save an author if you don't fill its name. It would not make sense in the Library application anyway, because an Author only has one attribute which is its name, nut we'll demonstrate how to enforce this). Open the LIB_Author Object Model in XEO Studio and select the "name" attribute. Go to the "Required" section and from the dropdown menu choose "BOL" (Business Object Language - read more - pôr link aqui) and in the text field that appears, write "true" (see figure OM.4f for details) and save the Object Model. XEO Studio will invoke the builder to process these changes.
Figure OM.4f - Adding a requirement condition to the name attribute of Author
If you now return the Author List Viewer and press the "New" Button, the result will be like the one depicted in figure OM.4g. Since the field is required it should not be possible to save this instance and if you press the "Save" Button, you'll be presented with the screen depicted in figure OM.4h. This section was just to show how easy it is to build these applications using XEO, more to come in the following sections.
Figure OM.4g - Author Edit Viewer with Name attribute required
Figure OM.4h - Error message when saving Author without name
XEO Library - Modelling the Entities:
With the Author created, we can pass to the other entities and create XEO Object Models for them.

| I | Attachment | Action | Size | Date | Who | Comment |
|---|---|---|---|---|---|---|
| |
AuthorRequiredAttribute.png | manage | 18.3 K | 2010-12-17 - 12:22 | PedroRio | Author Required Attribute |
| |
AuthorRequiredField.png | manage | 6.8 K | 2010-12-17 - 13:57 | PedroRio | Author Required Attribute Viewer |
| |
CreatedAuthor.png | manage | 9.6 K | 2010-12-17 - 12:02 | PedroRio | New Author in List |
| |
CreatingMainViewer.png | manage | 43.6 K | 2010-12-17 - 10:59 | PedroRio | Creating the Main Viewer |
| |
LibAuthorFirstAttribute.png | manage | 13.4 K | 2010-12-16 - 17:52 | PedroRio | Lib_Author name attribute |
| |
ListAuthors.png | manage | 5.0 K | 2010-12-17 - 11:02 | PedroRio | List Authors Viewer |
| |
NewAuthor.png | manage | 6.6 K | 2010-12-17 - 11:12 | PedroRio | New Author |
| |
ProfileChoice.png | manage | 17.8 K | 2010-12-17 - 11:01 | PedroRio | Profile Choice |
| |
RequiredFieldError.png | manage | 9.6 K | 2010-12-17 - 13:59 | PedroRio | Required Field Error |
| |
ScaffoldAuthorViewers.png | manage | 57.6 K | 2010-12-17 - 11:00 | PedroRio | Scaffolding Viewers |
| |
XEOObjectModelEditor.png | manage | 12.5 K | 2010-12-16 - 17:28 | PedroRio | |
| |
XEOObjectModelWizard.png | manage | 15.6 K | 2010-12-16 - 17:03 | PedroRio | |
| |
XEOPackageWizard.png | manage | 14.0 K | 2010-12-16 - 15:47 | PedroRio |
XEO Primer
- - Instalation
- - Introduction
- - Concepts
- - Architecture
- - XEO Library
- - Deploy to EAR
- - PreferenceStore
- - XEO Model Reference
- - Security
- - Java API
- - BOL
- - XEOQL (BOQL)
- - Administrating
- - Background Tasks
- - boConfig.xml
- - Web.xml
- - Known Issues
- - XEO Flags
- - Web Components
- - Java Samples
- - Custom Components
- - Component Plugins
- - Internationalization
- - Viewer Events
- - Value Change Listeners
- - XUIServlet
- - XeoLocalization
- - XvwTemplates
No permission to view TWiki.WebTopBar