XEO Studio
XEO Studio is a plugin to the popular Java IDE Eclipse and is the preferred development environment for a XEO Application. The XEO Studio plugin automates several tasks when developing a XEO application, such as configuring the database connection, upgrading to a newer version of the XEO Framework, creating XEO Models (and Viewers). You can download the latest XEO Studio version at our Source Forge page
Installing XEO Studio
First you should download the Eclipse for Java EE Developers from the Eclipse Download page.
To install the XEO Studio plugin just copy the XEOStudio.jar to the Eclipse plugins folder and start/restart Eclipse. A JDK6 must also be installed and _configured_ to create a XEO Application. To configure the JDK in Eclipse go to the Window Menu -> Preferences -> Java -> Installed JREs, click "Add", select "Standard VM" and for the JRE Home option choose the path to your JDK6 directory and click Finish. Then, check the box for the JDK in the list so that the JDK is the default JRE.
Note: The XEO Studio.jar file comes bundled with a release of the XEO Framework, however not every XEO Framework release originates a XEO Studio release, so do download the latest stable release.
Configuring MySQL
In order to use the MySQL database (version 5.0+ required) to create a XEO Application you need to set a few properties in the MySQL configuration file (my.ini / my.cnf, depending on the operating System), namely:
You should have the ANSI_QUOTES property added to the sql_mode variable, such as the following (in the [mysqld] section):
sql-mode="STRICT_TRANS_TABLES,NO_AUTO_CREATE_USER,NO_ENGINE_SUBSTITUTION,ANSI_QUOTES"
You should also add the following to your mysql configuration (in the [mysqld] and [mysqld_safe]
lower_case_table_names = 1
XEO uses the InnoDB storage engine when creating tables, as such you should make sure that InnoDB is you default storage engine, you can do that by adding the following line:
default-storage-engine=INNODB
Save the configuration file and restart MySQL.
JBOSS Windows Information (Important)
In order to use JBOSS as a development tool with XEOStudio you must run Eclipse as an Administrator user. Right-click the Eclipse executable and select "Run as Administrator". If you don't do this, XEO Studio won't have permission to create some symbolic links and copy some files in JBOSS's folder.
Additional Notes (Default User/Password)
The default user which you must use to login is SYSUSER with password ABC
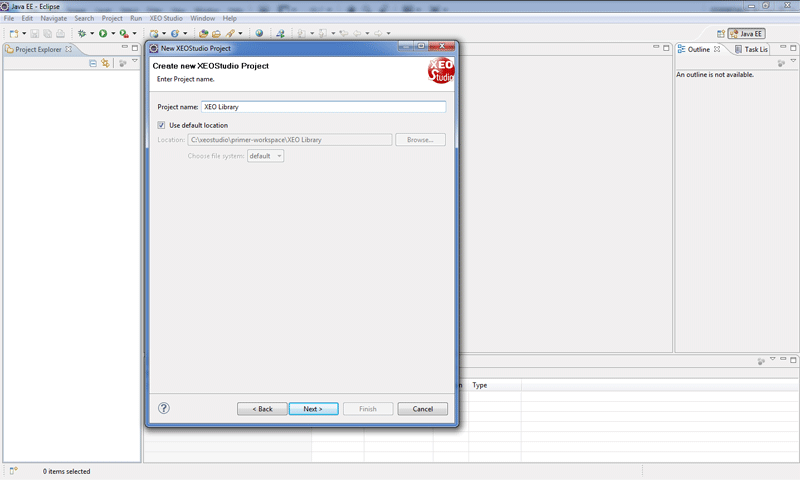
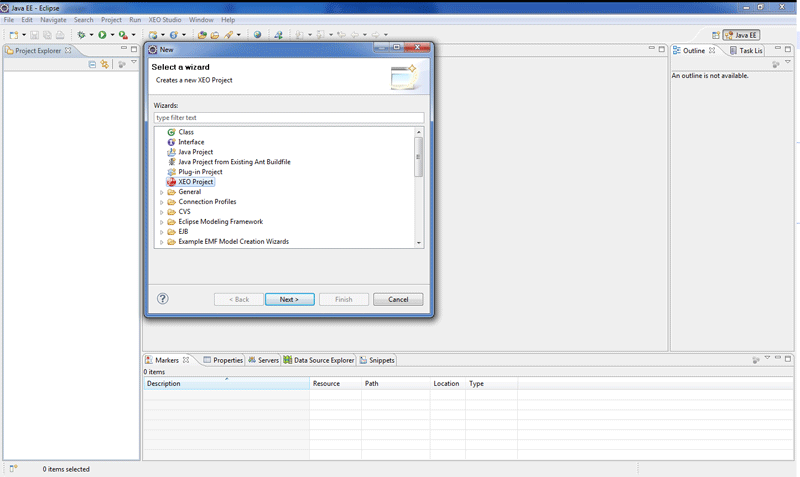
Creating a new Project
To create a new XEO Project, go to the "File" menu and select "XEO Project" from the selection menu, as depicted in figure XStudio.1

Figure XStudio.1 - New XEO Project creation wizard in XEO Studio
Next, you'll be presented with the screen to choose the name of the project, as depicted in figure XStudio.2. Write "XEOLibrary" as the project name and press next. (Project Names cannot have spaces, i.e. "XEO Library" is not a valid name, but "XEO_Library" or "XEOLibrary" are).

Figure XStudio.2 - Project name in new XEO Project Wizard
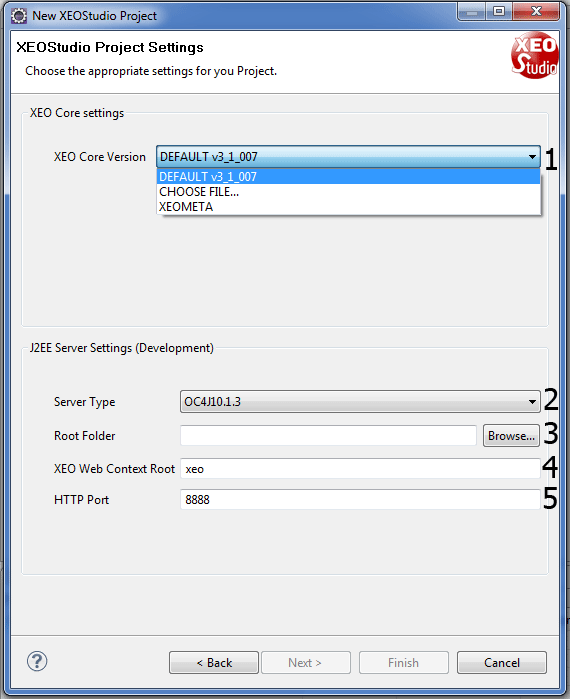
In the next screen, depicted in figure XStudio.3 you need to choose the version of the XEO Framework to create the project with (XStudio.3 label 1), and for that you can use the default version bundled with XEO Studio, or choose the XEOCore.xar (more information about .xar files in the following sections) from the file system. (The XEOMeta option is not currently implemented).
Next, you need to choose the J2EE Application Server (XStudio.3 label 2), currently only Oracle's OC4J and JBoss are supported directly in XEO Studio for development, but XEO will work with any compliant J2EE server.
In label 3 and 4, (Figure XStudio.3) you choose the web context root for your web application and the port for you application. If you write xeo/8888 in the fields (respectively), your application will be accessible at http://localhost:8888/xeo.
 Figure XStudio.3 - XEO Framework version and WebApplication/WebServer definition
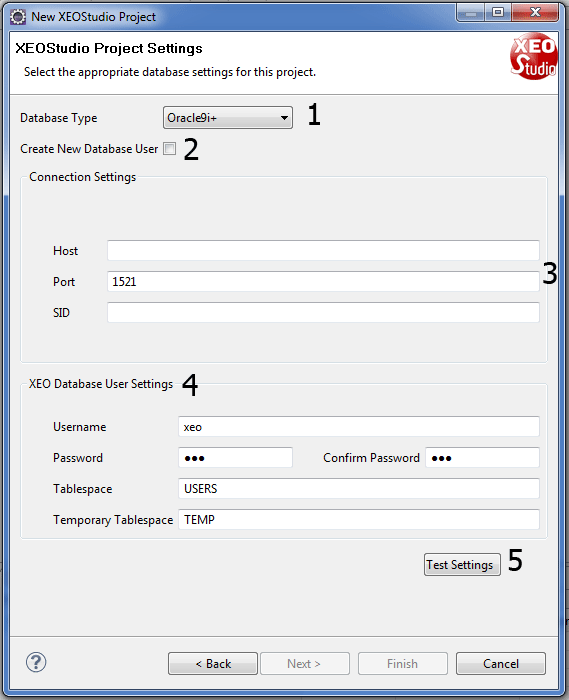
By pressing the Next button you'll be taken to the Database Configuration screen (depicted in Figure XStudio.4, bellow). The database configuration screen allows to choose on the supported databases (currently, Oracle 9i+, MySQL 5.1+ or MS SQL Server 2005+, see label 1 of the figure - Oracle and SQL Server only in XEO Enterprise version) and then fill the required connection information as well as user credentials. When connecting the XEO application to a database you can create a new user or reuse an existing one (MS SQL Server is the exception, you can only reuse an existing user), in label 2 of the figure there's a checkbox which allows to create a new database user (if it's unchecked it'll use the credentials of an existing user [fields bellow label 4]). Label 3 in the figure is the area where connection parameters are defined, the host where the database is located, the port and, in Oracle's case, the SID (if it were MySQL it would be the database name)
The XEO Database User Settings (label 4 in the figure) allow you to input your database user credentials (with Oracle's database you'll also need the Tablespace and the Temporary Tablespace).

Figure XStudio.4 - Database Definitions
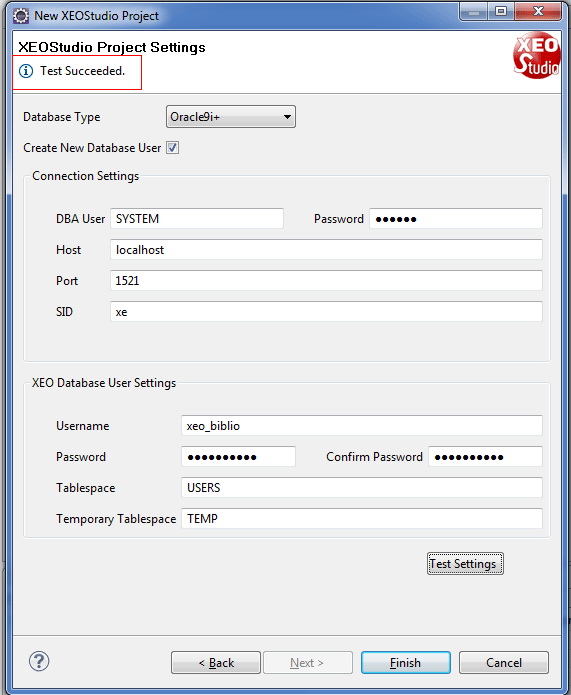
When all values are filled you need to press the "Test Settings" button (label 5, in figure XStudio.4) to check if everything is correct. If no problems occur the "Finish" button will become active so that the project can be created. A small message will appear at the top of the screen if everything is ok (see Figure XStudio.5). If anything is wrong, a popup with the error message will appear, describing the error. Pressing the "Finish" button will create the project in your workspace.

Figure XStudio.5 - Database Connection OK
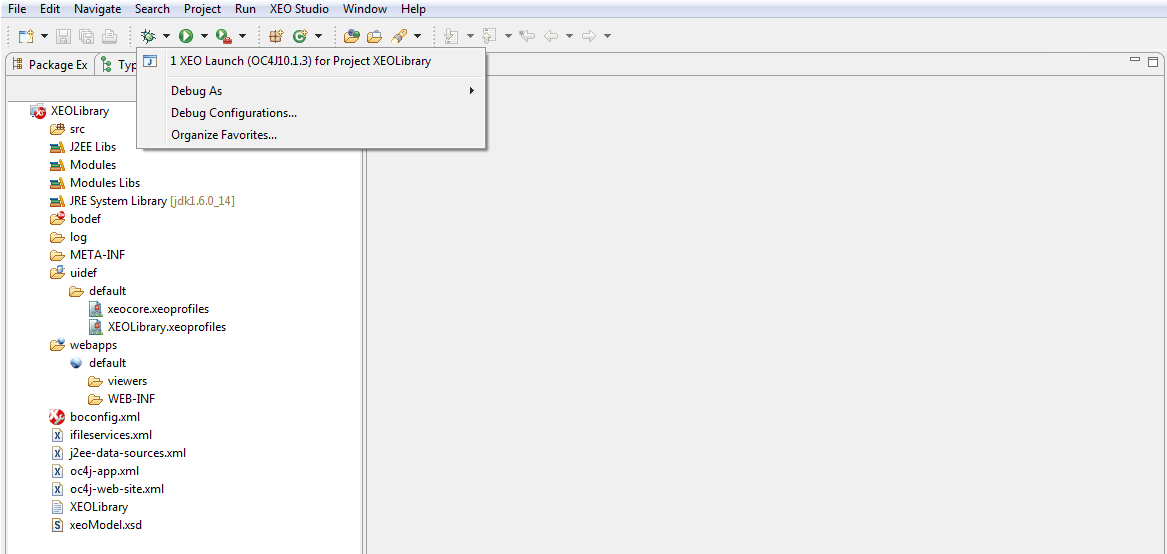
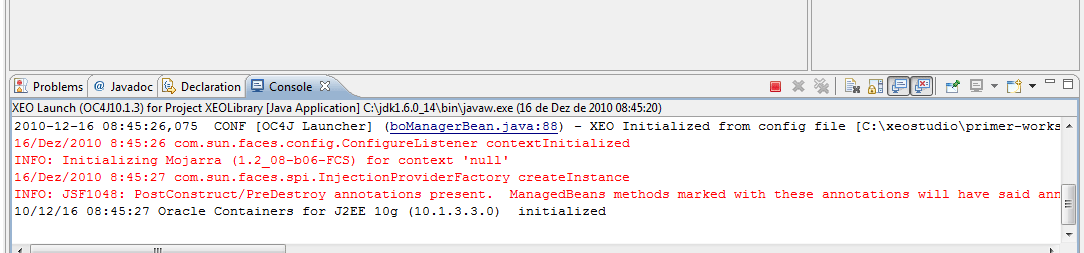
When the wizard finishes, we can launch/deploy the project directly from Eclipse, because XEO Studio added a Degug/Run Launch Configuration to Eclipse for the project, as seen in Figure XStudio.5a. Open the "Debug Configurations" menu and select the newly created configuration. Eclipse will deploy the application in the application server (in this case, OC4J).

Figure XStudio.5a - Debug Configuration Menu after XEO Project creation
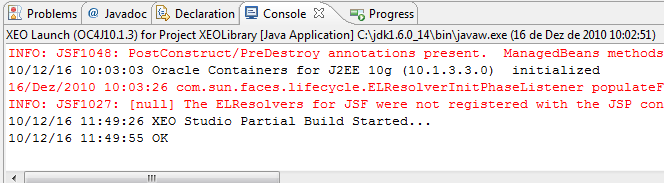
When the project is deployed, you should see in Eclipse's console the message: "Oracle Containers for J2EE 10g (10.1.3.3.0) initialized". As depicted in figure XStudio.5b

Figure XStudio.5b - Console message when a XEO Project is deployed in the application server
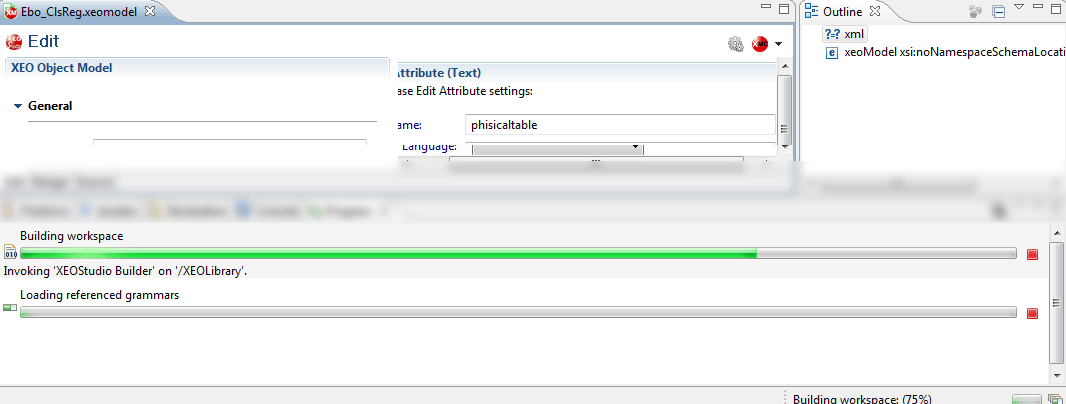
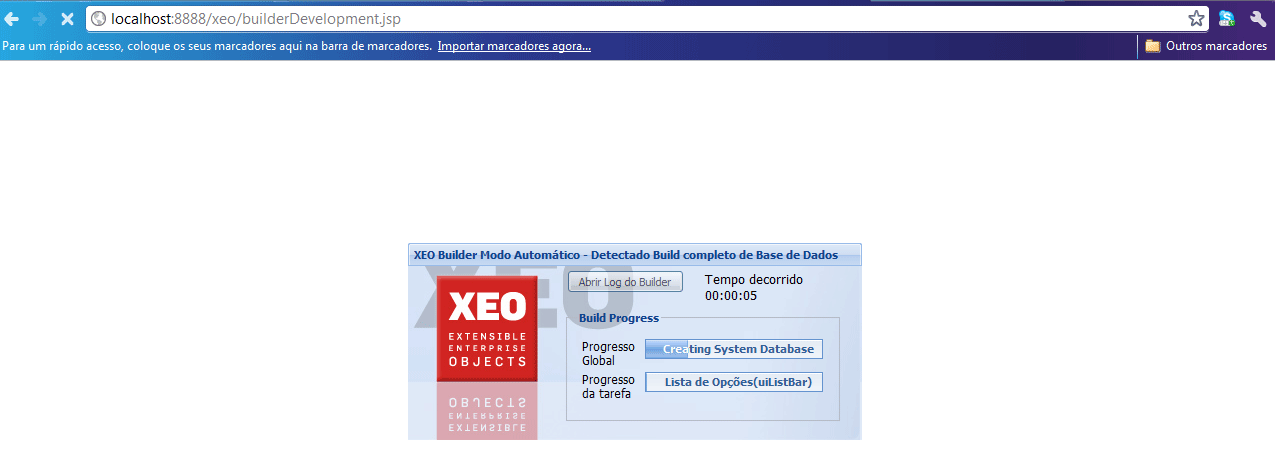
After this, open your web browser and point it to http://localhost:8888/xeo/Login.xvw. Since it's the first time the project is deployed the XEO Builder will kick-in an make the initial build (see XEO Builder).

Figure XStudio.5c - XEO Builder after project creation
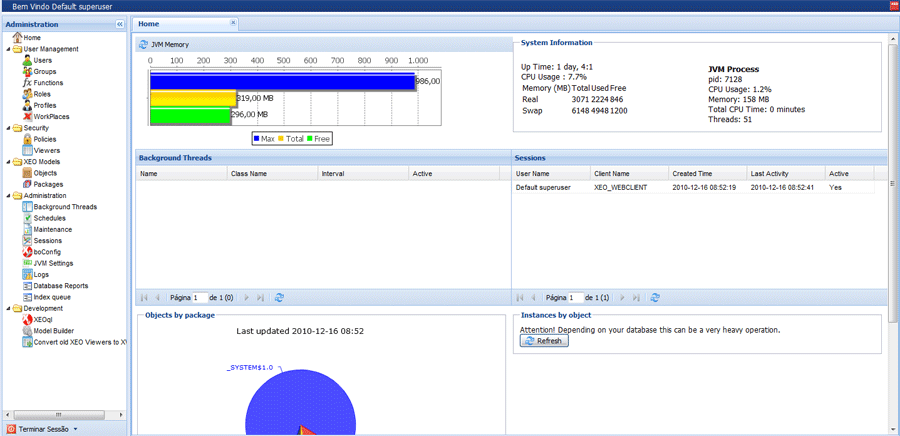
The Build process is relatively quick in a new project (varies depending on database, Oracle is faster than MySQL) but depends on the number of XEO Models, because each XEO Model has to be converted to a Java class, compiled and then the database tables must be created/altered. This is done only the first time the project is created, when you add another XEO Model to your project only that Model will go through these steps (unless you force a complete build). When the XEO Builder finishes you'll be taken to the Login page (Login.xvw), use the default system username SYSUSER/ABC. It will redirect you to the Main_admin.xvw Viewer (see figure XStudio.5d bellow) where you can manage your XEO Application (from an Administrator's point of view), it will automatically open a tab with some statistics about your application.

Figure XStudio.5d - XEO Application Admin Viewer
At this point your application is up an running and you could start creating new XEO Models and Viewers. Next you'll learn how a XEO Project is organized.
Understanding the structure of XEO Project
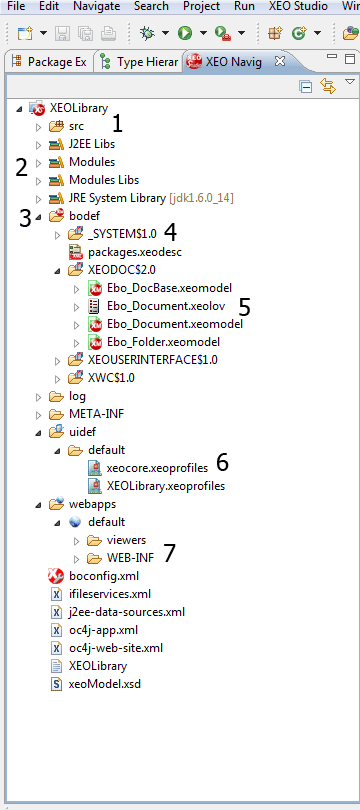
Every XEO Application has the same structure (in terms of files/folders), depicted in figure XStudio.6, to allow XEO Studio to recognize each folder and put xeo models/viewers and XEO related files in their right places. The structure (following the labels in figure XStudio.6) is as follows:
- Src - Java source code (your code goes in here, just like a regular Java Project).
- J2EE Libs, Modules, Module Libs - Where all the Jars that are required from XEO Core System and XEO Modules are placed.
- bodef - The folder where XEO Packages (which will contain XEO Models) are placed, includes a packages.xeodesc file with descriptions of each XEO Package.
- A XEO Package, each XEO Package can have any number of XEO Models, it can also have XEO Sub-Packages.
- XEO Lovs (List of values) - XEO Packages can store not only XEO Models, but also static lists of values which can be reused by the Models to declare the possible values of a given attribute, these are files have the *.xeolov extension.
- uidef/default - Default Profiles for the application, which will be discussed further in the documentation. Users in a XEO application can have profiles which may be used to restrict their actions. Files in this folder contain definitions of profiles to be created by the XEO Builder.
- Default web app - All your web resources (including *.xvw files [Viewers]) go in here.

Figure XStudio.6 - XEO Project Structure
Inside the bodef folder is where all XEO Models are placed (both the XEO Models that are provided by the XEO framework as well as the XEO Models specifically created for your application). XEO's System Packages include the following (details on important Object Models bundled with the framework will be explained as needed throughout the documentation:
- SYSTEM$1.0
- XEODOC$2.0
- XEOUSERINTERFACE$1.0
- XWC$1.0
Why the $1.0/$2.0 in the package name?
Historic reasons: The main purpose of those values is to help developers knowing the version of the package being used. In a long-term XEO application (and with the framework itself) packages undergo changes and maintenance and those changes are significant enough the version of the package may warrant a change.
It's only a convention and does not affect the behavior of the platform.
XEO *.xar files
A XAR (Xeo ARchive) file is basically a container for XEO Projects (including the XEO Framework itself). The XEO framework is distributed inside a XAR file and you can also export a XEO Project as a XAR file and import that Project in another XEO Studio instance. XEO Modules are also installed (and distributed) using XAR files.
XEO Builder Integration with XEO Studio.
As explained in the XEO Concepts section, at the heart of XEO is the Builder, which deals with the convertion of XEO Models to Java classes and Databases tables, their constraints, indexes, etc. XEO Studio has a direct connection to the Builder, which means each time a XEO Model is saved in XEO Studio, the Builder is invoked (the Builder knows which Models were changed since the last build). The process is depicted in figure XStudio7.a which shows what happens when a given XEO Model is saved.

Figure XStudio7.a - XEO Studio invoking the XEO Builder after a XEO Model is saved
XEO Studio also registers in the console when the build started and when the build ended, as depicted in figure XStudio7.b.

Figure XStudio7.b - XEO Studio output to the console of the build status
_
XEO Builder inside a XEO Application
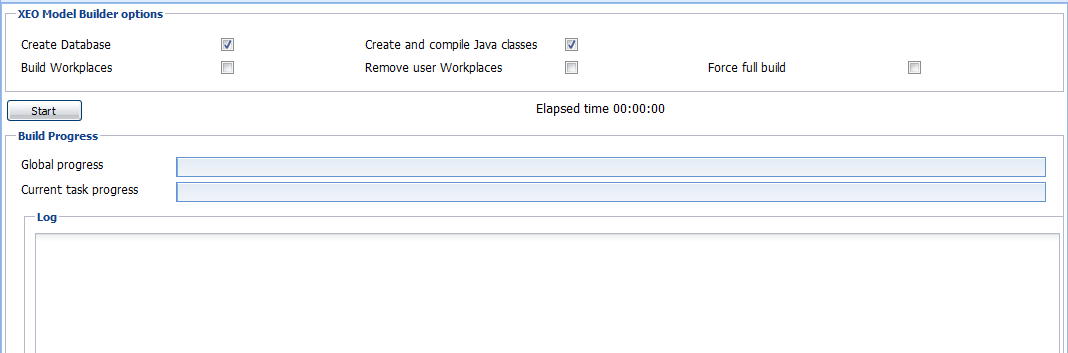
The XEO Builder is also available within every XEO application, you just need to go the builderApplet (http://localhost:8888/xeo/builderApplet.jsp) or login with SYSUSER/ABC with the "admin" profile (when you start a new project only this profile exists) and then find the XEO Model Builder entry in the menu. The builderApplet is depicted in figure XStudio.8, in which you can choose which operations should be executed in that build operation.

Next
In the next section you'll start by modelling the first Library XEO Model, and then proceed to the rest of the Models.


| I | Attachment | Action | Size | Date | Who | Comment |
|---|---|---|---|---|---|---|
| |
LaunchProject.png | manage | 18.8 K | 2010-12-16 - 08:29 | PedroRio | |
| |
MainAdmin.png | manage | 37.0 K | 2010-12-16 - 09:16 | PedroRio | |
| |
NPWDatabase.png | manage | 17.1 K | 2010-12-15 - 15:31 | PedroRio | |
| |
NPWDatabaseOK.png | manage | 17.2 K | 2010-12-15 - 15:48 | PedroRio | |
| |
NPWProjectName.png | manage | 24.7 K | 2010-12-15 - 14:33 | PedroRio | |
| |
NPWWebApp.png | manage | 18.1 K | 2010-12-15 - 14:41 | PedroRio | |
| |
NewProjectWizard.png | manage | 28.2 K | 2010-12-15 - 14:27 | PedroRio | XEO Studio Project |
| |
ProjectDeployedConsole.png | manage | 15.3 K | 2010-12-16 - 08:47 | PedroRio | |
| |
ProjectStructure.png | manage | 17.5 K | 2010-12-15 - 16:22 | PedroRio | XEO Project Structure |
| |
XEOModelBuilderApplet.png | manage | 6.1 K | 2010-12-16 - 14:47 | PedroRio | |
| |
XEOStudioBuilder1.png | manage | 25.4 K | 2010-12-16 - 11:58 | PedroRio | |
| |
XEOStudioBuilder2.png | manage | 10.1 K | 2010-12-16 - 12:00 | PedroRio | |
| |
XeoBuilder.png | manage | 32.2 K | 2010-12-15 - 17:22 | PedroRio |
- - Instalation
- - Introduction
- - Concepts
- - Architecture
- - XEO Library
- - Deploy to EAR
- - PreferenceStore
- - XEO Model Reference
- - Security
- - Java API
- - BOL
- - XEOQL (BOQL)
- - Administrating
- - Background Tasks
- - boConfig.xml
- - Web.xml
- - Known Issues
- - XEO Flags
- - Web Components
- - Java Samples
- - Custom Components
- - Component Plugins
- - Internationalization
- - Viewer Events
- - Value Change Listeners
- - XUIServlet
- - XeoLocalization
- - XvwTemplates
No permission to view TWiki.WebTopBar