-- PedroRio - 07 Jan 2011
 XWC.1 - XEO Bean Hierarchy (including custom Beans)
As depicted in figure XWC.1, there are five different types of Bean suspplied by the framework (XEOBaseBean, XEOBaseList, XEOEditBean, XEOMainBean and XEOBaseLookupList). Each of them is designed for a specific purpose, and provides tools that aid in that purpose:
XWC.1 - XEO Bean Hierarchy (including custom Beans)
As depicted in figure XWC.1, there are five different types of Bean suspplied by the framework (XEOBaseBean, XEOBaseList, XEOEditBean, XEOMainBean and XEOBaseLookupList). Each of them is designed for a specific purpose, and provides tools that aid in that purpose:  Figure XWC.2 - Creating a blank viewer.
XEO Studio uses a template to create the viewer, and in the blank case the code is the following (the viewer will be located in the:
Figure XWC.2 - Creating a blank viewer.
XEO Studio uses a template to create the viewer, and in the blank case the code is the following (the viewer will be located in the:
 Figure XWC.3 - Creating a custom Java Bean for a viewer
Return to the MyViewer.xvw file and fill the beanClass attribute with "org.example.viewers.beans.MyBean" to be like the following:
Figure XWC.3 - Creating a custom Java Bean for a viewer
Return to the MyViewer.xvw file and fill the beanClass attribute with "org.example.viewers.beans.MyBean" to be like the following:
 Figure XWC.4 - XEOStudio's Viewer Preview
To make it more interesting you'll add outputHTML component which will allow you to print html content inside the viewer and that content will be binded to a bean property to make dinamic. Add the following to the viewer (bellow the rows components:
Figure XWC.4 - XEOStudio's Viewer Preview
To make it more interesting you'll add outputHTML component which will allow you to print html content inside the viewer and that content will be binded to a bean property to make dinamic. Add the following to the viewer (bellow the rows components:
 Figure XWC.5 - Random value printed by the outputHtml component
______
To open a viewer from a Main Viewer you'll first create it by using XEO Studio's wizards. Go to the "File" menu, choose "New" and "XEO Web Viewer". From the list of templates choose "Main Viewer" and press next. Name the viewer "Main_Library", uncheck the "create new profile" box (more on that later) and press finish. A Main_Library.xvw file will be created in the root of the viewers folder (webapps/default/viewers). To make things easier, the Main_Library viewer should be our default Main viewer. In order to change that open the XEOLibrary.xeoprofiles file in uidef and change the following line:
Figure XWC.5 - Random value printed by the outputHtml component
______
To open a viewer from a Main Viewer you'll first create it by using XEO Studio's wizards. Go to the "File" menu, choose "New" and "XEO Web Viewer". From the list of templates choose "Main Viewer" and press next. Name the viewer "Main_Library", uncheck the "create new profile" box (more on that later) and press finish. A Main_Library.xvw file will be created in the root of the viewers folder (webapps/default/viewers). To make things easier, the Main_Library viewer should be our default Main viewer. In order to change that open the XEOLibrary.xeoprofiles file in uidef and change the following line:
 Figure XWC.6 - Main Library Viewer
If you open the Main_Library.xvw viewer, you'll see a set of elements (which will be explained later), but the important ones are the xvw:treePanel component and the set of xvw:menu components. The xvw:treePanel component is responsible for the creating the tree structure while the xvw:menu components are the entries in the treePanel. Nested xvw:menu elements are used to create groups (folders) and each xvw:menu entry can be restricted to a given profile (that's while the template for the Main_Library.xvw file has lots of xvw:menu entries but when you login, you only see four of the them (the Welcome and XEO Developers folder, and the "Welcome Page" and "XEO Model Builder" entries). In figure XWC.7 highlighted in blue are the two menu entries that you see when you login (the two folders); higlighted in red is the menu entry which is associated with the "admin" profile. If you login with SYSUSER/ABC, choose the XEO Administration profile and then point your browser to the "Main_Library.xvw" file you'll be able to see the rest of the entries.
Figure XWC.6 - Main Library Viewer
If you open the Main_Library.xvw viewer, you'll see a set of elements (which will be explained later), but the important ones are the xvw:treePanel component and the set of xvw:menu components. The xvw:treePanel component is responsible for the creating the tree structure while the xvw:menu components are the entries in the treePanel. Nested xvw:menu elements are used to create groups (folders) and each xvw:menu entry can be restricted to a given profile (that's while the template for the Main_Library.xvw file has lots of xvw:menu entries but when you login, you only see four of the them (the Welcome and XEO Developers folder, and the "Welcome Page" and "XEO Model Builder" entries). In figure XWC.7 highlighted in blue are the two menu entries that you see when you login (the two folders); higlighted in red is the menu entry which is associated with the "admin" profile. If you login with SYSUSER/ABC, choose the XEO Administration profile and then point your browser to the "Main_Library.xvw" file you'll be able to see the rest of the entries.
 Figure XWC.7 - Main_Library.xvw XML definition (elements are colapsed for readability)
For the Main_Library viewer we'll want to arrange things in a different way, replace the contents of the xvw:treePanel component with the following:
Figure XWC.7 - Main_Library.xvw XML definition (elements are colapsed for readability)
For the Main_Library viewer we'll want to arrange things in a different way, replace the contents of the xvw:treePanel component with the following:
 Figure XWC.8 - MyViewer opened in Main_Library.xvw
This menu entry will not be reused for the Library application, it was just used to show how to open a viewer in a Main viewer. This completes our introduction to XEO Web Components and Viewers. The next step will be developing the Library application's viewers.
Figure XWC.8 - MyViewer opened in Main_Library.xvw
This menu entry will not be reused for the Library application, it was just used to show how to open a viewer in a Main viewer. This completes our introduction to XEO Web Components and Viewers. The next step will be developing the Library application's viewers.
XEO Web Components Introduction
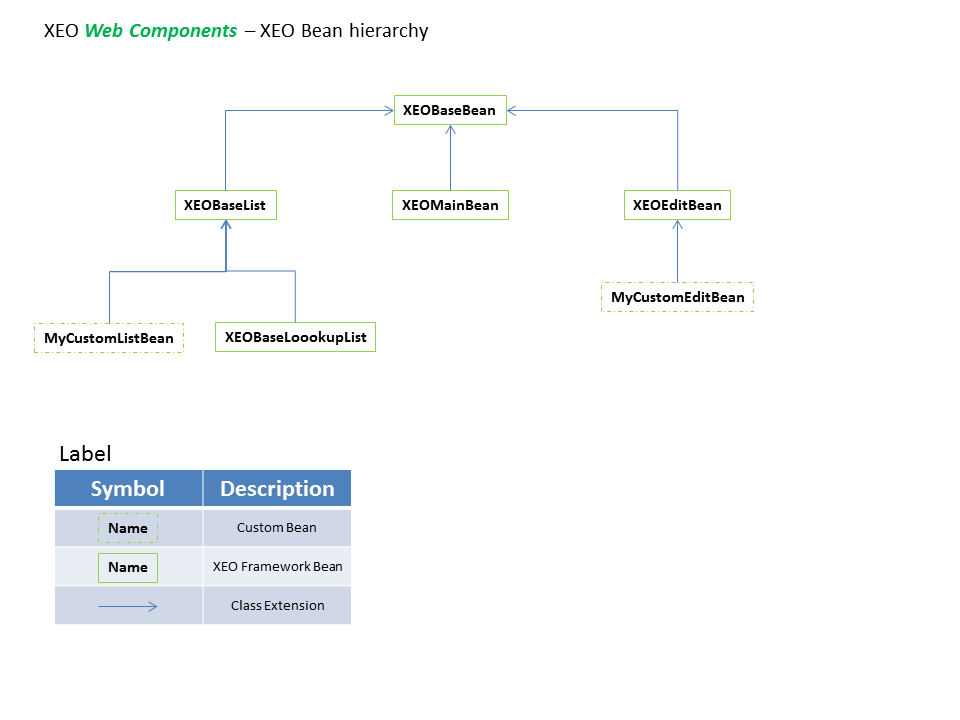
In order to finalize the XEO Library project we'll need the web pages, created with XEO's Web Components layer. As explained in XEO Concept's introduction chapter, XEO Viewers are the containers for XEO Components which will render the webpage. Each XEO Viewer is associated with a Java class (a Bean, just like those used in JSF based applications); in that bean are the structures required by the components and the viewer itself for a sucessfull render. Different types of Beans exist for the different types of Viewers in the XEO Framework, see figure XWC.1 for details.
XWC.1 - XEO Bean Hierarchy (including custom Beans)
As depicted in figure XWC.1, there are five different types of Bean suspplied by the framework (XEOBaseBean, XEOBaseList, XEOEditBean, XEOMainBean and XEOBaseLookupList). Each of them is designed for a specific purpose, and provides tools that aid in that purpose: - The XEOBaseList bean is suited to list instances which are selected through a XEOQL (BOQL) expression, usually in a list viewer
- The XEOEditBean allows to edit a specific instance object and can be used to create edit viewer that deals with multiple instances
- The XEOBaseLookupList is used to create a listing of instances to allow selection of one instance
- The XEOMainBean is the bean for the Main viewer to allow opening tabs/windows with viewers
- The XEOBaseBean is the (as the name suggests) the base bean for all other beans and provides the tools to create any custom viewer that does not fit any of the previous categories.
<xvw:menu text='#{viewBean.labelMenu}'
          serverAction="#{viewBean.execute}" />
*Note, viewBean is the identifier of the Bean in the viewer, as depicted in the following line (declaration of the viewer):
<xvw:viewer beanClass="netgest.bo.xwc.xeo.beans.XEOEditBean" beanId="viewBean">Java Source Code
public String getLabelMenu(){ return "My Menu"; }; public void execute() { /* execute some code here */ };
Opening a viewer from a Main Viewer
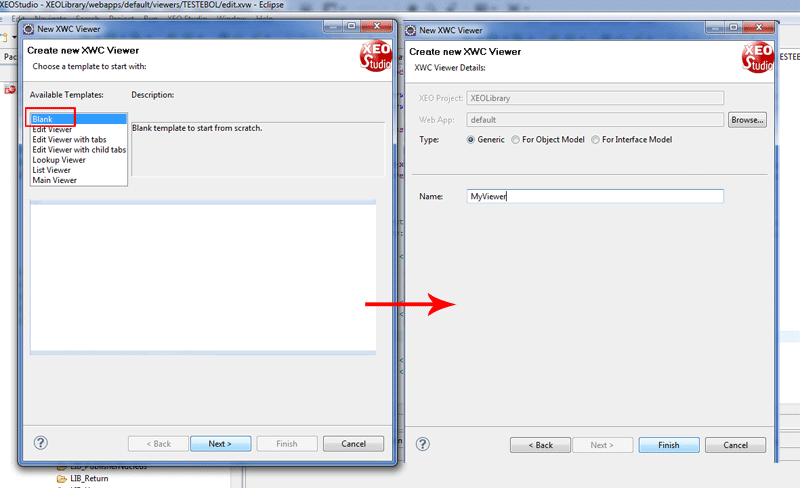
Main viewers are responsible for shaping a XEO Application. They define the structure of viewers that at first can be opened in the application's workspace, those viewers can be list, edit or custom viewers, usually they'll be list viewers, but they can be anything as the XEOMainBean has methods to open different types of viewers. We'll start with an example, by creating a tiny custom viewer that we'll open in a Main viewer (which we'll reuse later for the Library project). Fire up XEO Studio and select the XEOLibrary Project, go the "File" menu, and select "New" -> "XEO Web Viewer", choose "Blank" from the list, press next and then type "MyViewer" as the name of the viewer (as depicted in figure XWC.2).
Figure XWC.2 - Creating a blank viewer.
XEO Studio uses a template to create the viewer, and in the blank case the code is the following (the viewer will be located in the:
<xvw:root
    xmlns:xvw="http://www.netgest.net/xeo/xvw"
    xmlns:xeo="http://www.netgest.net/xeo/xeo"
>
    <xvw:viewer beanClass="" beanId="viewBean">
        <xvw:form>
        </xvw:form>
    </xvw:viewer>

</xvw:root>
Every XEO Viewer will have a root element (xvw:root) where the namespaces to be used in the viewer are declared. By default the xeo and xvw prefixes are declared so that all components provided by the XEO framework can be used. If you create custom components, you'll probably create them in a different namespace and when you need to use them in a viewer, they'll be declared in the root element. The xeo prefix is used for components which are tied (in some way) with XEO Object Model instances, while the xvw prefix is used for components which do not required any Object Model instance to work properly. In this small example we'll only required xvw-prefixed components.
Each XEO Viewer declaration also requires two things. A viewer component and a form component. The viewer component (xvw:viewer) indicates the fully qualified name of the Java bean class (throug the beanClass attribute), as well as its identifier (although, at the moment, the XEO framework only supports one bean identifier and it's viewBean, through the beanId attribute). The form component does not require any attributes, but it's required to allow component values to be posted to the bean.
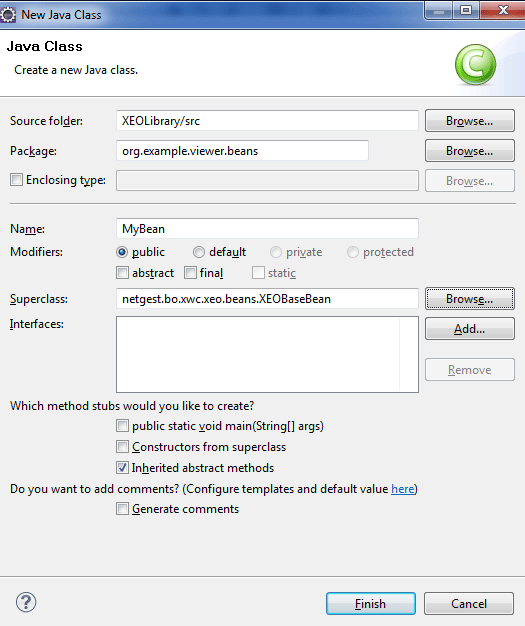
In order to continue, we'll require a Java bean. Go to the "File" menu, select "New" and choose "Class". Fill the package with "org.example.viewers.beans" and class name with MyBean, make it a subclass of netgest.bo.xwc.xeo.beans.XEOBaseBean, like depicted in figure XWC.3.
Figure XWC.3 - Creating a custom Java Bean for a viewer
Return to the MyViewer.xvw file and fill the beanClass attribute with "org.example.viewers.beans.MyBean" to be like the following:
<xvw:root
    xmlns:xvw="http://www.netgest.net/xeo/xvw"
    xmlns:xeo="http://www.netgest.net/xeo/xeo"
>
    <xvw:viewer beanClass="org.example.viewers.beans.MyBean" beanId="viewBean">
        <xvw:form></xvw:form>
    </xvw:viewer>

</xvw:root>
Ok, so now you're ready to add some components (which we'll bind to the bean to get the values). We'll add two tab components. The first tab will have a text field (with a label) and a date field (also with a label) and the second tab will have nothing (just its label). The code to achieve is the following:
<xvw:root xmlns:xvw="http://www.netgest.net/xeo/xvw" xmlns:xeo="http://www.netgest.net/xeo/xeo">
    <xvw:viewer beanClass="org.example.viewer.beans.MyBean"
        beanId="viewBean">
        <xvw:form>
            <xvw:tabs>
                <xvw:tab label='Tab1'>
                    <xvw:rows>
                        <xvw:row>
                            <xvw:cell>
                                <xvw:attribute label='Text'
                                inputType="attributeText"></xvw:attribute>
                            </xvw:cell>
                            <xvw:cell>
                                <xvw:attribute label='Date'
                                inputType="attributeDate"></xvw:attribute>
                            </xvw:cell>
                        </xvw:row>
                    </xvw:rows>
                </xvw:tab>
                <xvw:tab label='Tab2' />
            </xvw:tabs>
        </xvw:form>
    </xvw:viewer>
</xvw:root>
As explained before, the form encapsulates all components. The first component is a "Tabs" component which is a container for "Tab" components (in this example we have two, each with a label ("Tab1" and "Tab2"). Inside our first tab, we'll make use of the Rows/Row/Cell component set (this allows to use a tabular layout which in case of form fields gives it a nicer look). Inside each of the Cell components we have "attribute" components which translates to a generic form field which can be declared to be a text, number, date, datetime, longtext, file or html.
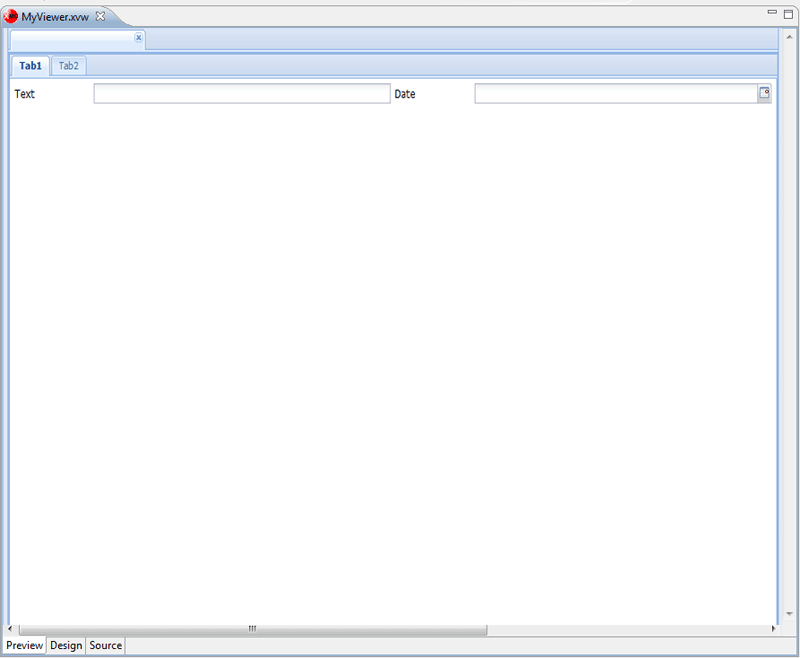
You can use XEO Studio's built-in Viewer Preview, just like depicted in figure XWC.4, bellow, to preview the layout of a viewer while designing the viewer (you'll have to launch the project before that, so that can preview the viewers), just open the MyViewer viewer and press the "Preview" tab.
Figure XWC.4 - XEOStudio's Viewer Preview
To make it more interesting you'll add outputHTML component which will allow you to print html content inside the viewer and that content will be binded to a bean property to make dinamic. Add the following to the viewer (bellow the rows components:
<xvw:outputHtml valueExpression = #{viewBean.html}>
Next, add the following code to your bean.
private String html;

    public String getHtml(){

        String result = "<b>";
        result += Math.random();
        result += "</b>";
        html = result;
        return html;
    }
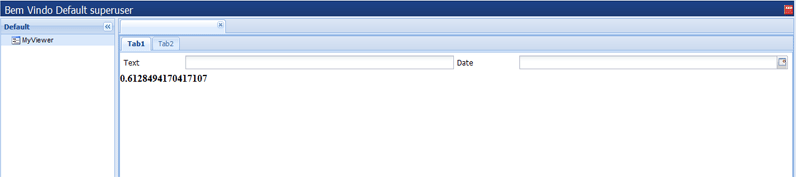
This previous code will render a random number in bold each time the viewer is opened (or each time you change tabs), as you can see in the figure XWC.5 (highlighted in red).
Figure XWC.5 - Random value printed by the outputHtml component
______
To open a viewer from a Main Viewer you'll first create it by using XEO Studio's wizards. Go to the "File" menu, choose "New" and "XEO Web Viewer". From the list of templates choose "Main Viewer" and press next. Name the viewer "Main_Library", uncheck the "create new profile" box (more on that later) and press finish. A Main_Library.xvw file will be created in the root of the viewers folder (webapps/default/viewers). To make things easier, the Main_Library viewer should be our default Main viewer. In order to change that open the XEOLibrary.xeoprofiles file in uidef and change the following line:
<profile viewer="Main.xvw" id="Library" description="Library Profile"/>with
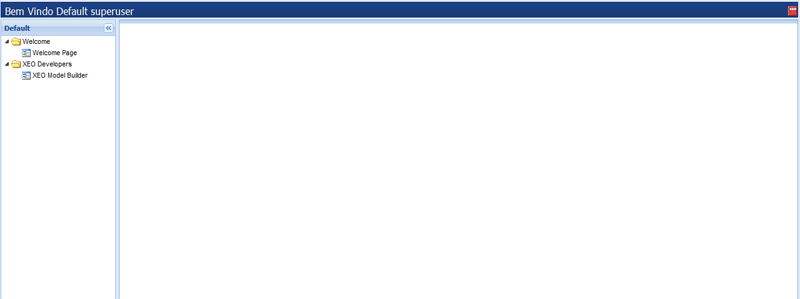
<profile viewer="Main_Library.xvw" id="Library" description="Library Profile"/>This will replace the default "Main.xvw" viewer with our newly created Main_Library.xvw viewer, when a user logins with the "Library Profile". To see the result, launch the application and login with SYSUSER/ABC and the Library Profile, it should be like the one depicted in figure XWC.6.
Figure XWC.6 - Main Library Viewer
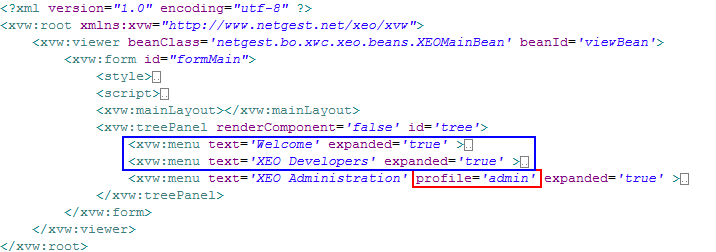
If you open the Main_Library.xvw viewer, you'll see a set of elements (which will be explained later), but the important ones are the xvw:treePanel component and the set of xvw:menu components. The xvw:treePanel component is responsible for the creating the tree structure while the xvw:menu components are the entries in the treePanel. Nested xvw:menu elements are used to create groups (folders) and each xvw:menu entry can be restricted to a given profile (that's while the template for the Main_Library.xvw file has lots of xvw:menu entries but when you login, you only see four of the them (the Welcome and XEO Developers folder, and the "Welcome Page" and "XEO Model Builder" entries). In figure XWC.7 highlighted in blue are the two menu entries that you see when you login (the two folders); higlighted in red is the menu entry which is associated with the "admin" profile. If you login with SYSUSER/ABC, choose the XEO Administration profile and then point your browser to the "Main_Library.xvw" file you'll be able to see the rest of the entries.
Figure XWC.7 - Main_Library.xvw XML definition (elements are colapsed for readability)
For the Main_Library viewer we'll want to arrange things in a different way, replace the contents of the xvw:treePanel component with the following:
<xvw:treePanel renderComponent='false' id='tree'>
                <xvw:menu text='MyViewer'
                         value="{viewerName:'MyViewer.xvw'}"
                        target='Tab'
                        serverAction="#{viewBean.openViewer}">
                </xvw:menu>
</xvw:treePanel>


| I | Attachment | Action | Size | Date | Who | Comment |
|---|---|---|---|---|---|---|
| |
CreateViewer.png | manage | 38.7 K | 2011-01-11 - 15:31 | PedroRio | |
| |
CustomBean.png | manage | 19.9 K | 2011-01-11 - 16:19 | PedroRio | |
| |
MainViewerXML.png | manage | 7.5 K | 2011-01-13 - 09:40 | PedroRio | |
| |
Main_Library.png | manage | 5.3 K | 2011-01-13 - 09:09 | PedroRio | |
| |
Main_Library_Arranged.png | manage | 5.9 K | 2011-01-13 - 09:58 | PedroRio | |
| |
MyViewer.png | manage | 8.7 K | 2011-01-12 - 10:05 | PedroRio | |
| |
RandomValue.png | manage | 4.4 K | 2011-01-12 - 18:03 | PedroRio | |
| |
XWC_BeanHierarchy.png | manage | 16.9 K | 2011-01-10 - 15:39 | PedroRio |
XEO Primer
- - Instalation
- - Introduction
- - Concepts
- - Architecture
- - XEO Library
- - Deploy to EAR
- - PreferenceStore
- - XEO Model Reference
- - Security
- - Java API
- - BOL
- - XEOQL (BOQL)
- - Administrating
- - Background Tasks
- - boConfig.xml
- - Web.xml
- - Known Issues
- - XEO Flags
- - Web Components
- - Java Samples
- - Custom Components
- - Component Plugins
- - Internationalization
- - Viewer Events
- - Value Change Listeners
- - XUIServlet
- - XeoLocalization
- - XvwTemplates
No permission to view TWiki.WebTopBar