-- PedroRio - 16 Dec 2010
 Figure OM.1 - XEO Package Wizard
Next we need to use the XEO Object Model wizard, to create the new Object Model. Go to the "File" menu, select "New" and choose "XEO Object Model". In the "XEO Package" field choose the "Lib$1.0" package just created and the "Name" field type "LIB_Author" (in this project, all Object Models will be prefixed with "LIB_"), enter a description of the XEO Object Model and leave all other fields with their default values (see figure OM.2).
Figure OM.1 - XEO Package Wizard
Next we need to use the XEO Object Model wizard, to create the new Object Model. Go to the "File" menu, select "New" and choose "XEO Object Model". In the "XEO Package" field choose the "Lib$1.0" package just created and the "Name" field type "LIB_Author" (in this project, all Object Models will be prefixed with "LIB_"), enter a description of the XEO Object Model and leave all other fields with their default values (see figure OM.2).
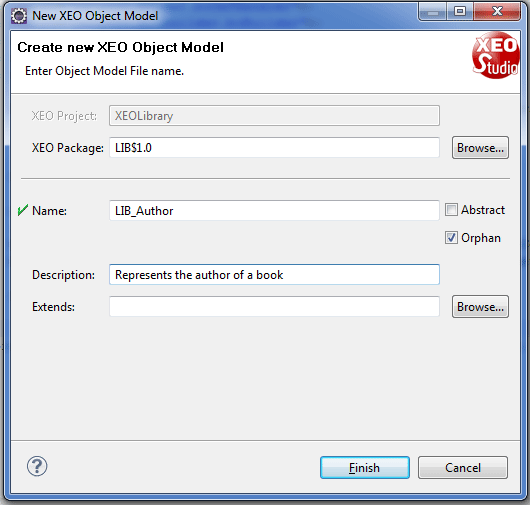
 Figure OM.2 - XEO Object Model Wizard
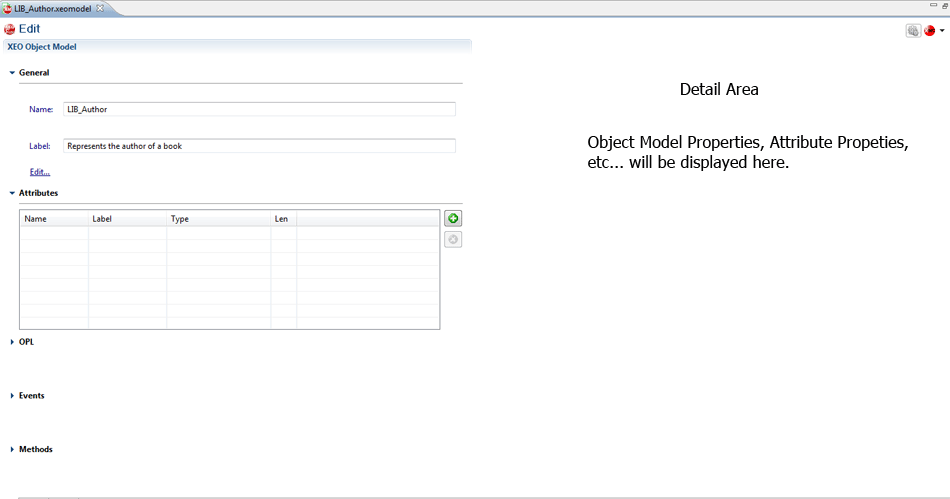
Now, open the Object Model, this will open the Object Model Editor, which has three different views: Edit, Design and Source. Edit is the graphical editor for the XML Language, Design is Eclipse's XML editor, and Source is the XML source code. The Object Model Editor (in design mode) is depicted in figure OM.3. Which is designed as a master-detail interface. The left panel has all the main properties of an Object Model (Model properties, Attributes, Events, OPL, Methods) while the right panel (Detail Area) displays the properties of the given element chosen from the left panel.
Figure OM.2 - XEO Object Model Wizard
Now, open the Object Model, this will open the Object Model Editor, which has three different views: Edit, Design and Source. Edit is the graphical editor for the XML Language, Design is Eclipse's XML editor, and Source is the XML source code. The Object Model Editor (in design mode) is depicted in figure OM.3. Which is designed as a master-detail interface. The left panel has all the main properties of an Object Model (Model properties, Attributes, Events, OPL, Methods) while the right panel (Detail Area) displays the properties of the given element chosen from the left panel.
 Figure OM.3 - XEO Object Model Editor, for the Author
 Figure OM.3a - Editing attribute name
As soon as you save the model, the XEO Builder will kick-in to create the required structures for your Object Model.
Figure OM.3a - Editing attribute name
As soon as you save the model, the XEO Builder will kick-in to create the required structures for your Object Model.
Object Modelling - XEO Library
In this chapter we'll learn how to model the XEO Library entities into XEO Object Models. We'll begin by modelling the simplest entity we have: The author. Before that, however, we want to group all XEO Object Models in the same XEO Package, for that we'll use the XEO Package Wizard in XEO Studio. Go to the "File" menu, choose "New" and select "XEO Package". A new window will open to allow you to choose the package name (we'll follow the XEO convention and name it LIB$1.0) and we give it a small description such as "XEO Library Object Models", leaving the Parent Package field blank (we won't use subpackages in the Library project), see figure OM.1 for details.
Figure OM.1 - XEO Package Wizard
Next we need to use the XEO Object Model wizard, to create the new Object Model. Go to the "File" menu, select "New" and choose "XEO Object Model". In the "XEO Package" field choose the "Lib$1.0" package just created and the "Name" field type "LIB_Author" (in this project, all Object Models will be prefixed with "LIB_"), enter a description of the XEO Object Model and leave all other fields with their default values (see figure OM.2).
Figure OM.2 - XEO Object Model Wizard
Now, open the Object Model, this will open the Object Model Editor, which has three different views: Edit, Design and Source. Edit is the graphical editor for the XML Language, Design is Eclipse's XML editor, and Source is the XML source code. The Object Model Editor (in design mode) is depicted in figure OM.3. Which is designed as a master-detail interface. The left panel has all the main properties of an Object Model (Model properties, Attributes, Events, OPL, Methods) while the right panel (Detail Area) displays the properties of the given element chosen from the left panel.
Figure OM.3 - XEO Object Model Editor, for the Author
Creating an Attribute
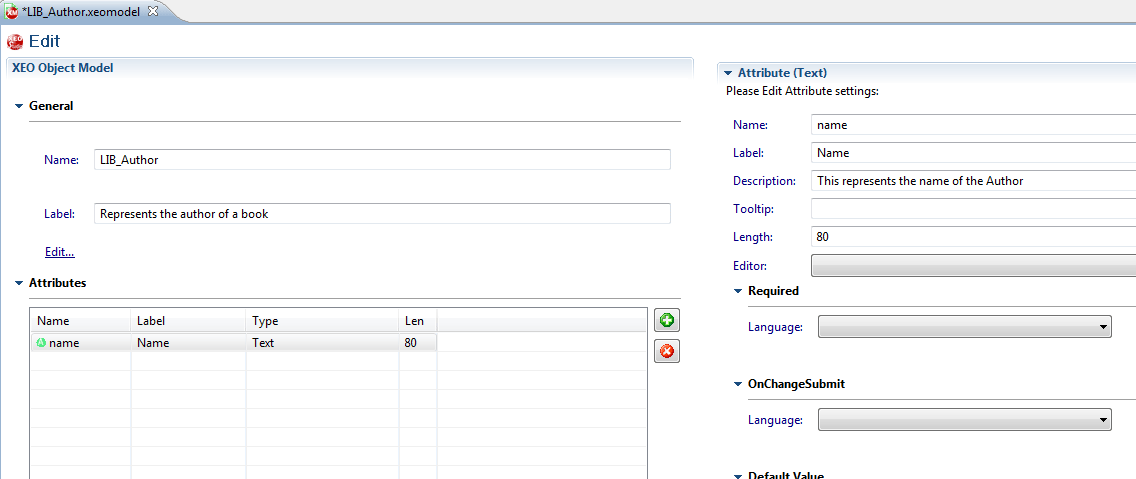
With the LIB_Author Object Model open, let's add an attribute. Back in the XEO Library introduction the author entity was defined as only having one attribute, which was its name. A name will be a textual value, thus, we want to add an "Text" attribute to LIB_Author. Click the "Plus" green button in the Attributes section of the left panel and from the list choose "Text". This will add the attribute to the list and open the detail panel with the newly created attribute. In the "name" field, write "name" and in the label "Name" (Or "Author Name") this is the value that'll be used in edit viewers. You can write a description (documentation) of the attribute and set the length with a maximum of 80 characters (see figure OM.3a). The "name" field is the name which we'll use when dealing with the Java API when interacting with this particular attribute.
Figure OM.3a - Editing attribute name
As soon as you save the model, the XEO Builder will kick-in to create the required structures for your Object Model. 

| I | Attachment | Action | Size | Date | Who | Comment |
|---|---|---|---|---|---|---|
| |
LibAuthorFirstAttribute.png | manage | 13.4 K | 2010-12-16 - 17:52 | PedroRio | Lib_Author name attribute |
| |
XEOObjectModelEditor.png | manage | 12.5 K | 2010-12-16 - 17:28 | PedroRio | |
| |
XEOObjectModelWizard.png | manage | 15.6 K | 2010-12-16 - 17:03 | PedroRio | |
| |
XEOPackageWizard.png | manage | 14.0 K | 2010-12-16 - 15:47 | PedroRio |
XEO Primer
- - Instalation
- - Introduction
- - Concepts
- - Architecture
- - XEO Library
- - Deploy to EAR
- - PreferenceStore
- - XEO Model Reference
- - Security
- - Java API
- - BOL
- - XEOQL (BOQL)
- - Administrating
- - Background Tasks
- - boConfig.xml
- - Web.xml
- - Known Issues
- - XEO Flags
- - Web Components
- - Java Samples
- - Custom Components
- - Component Plugins
- - Internationalization
- - Viewer Events
- - Value Change Listeners
- - XUIServlet
- - XeoLocalization
- - XvwTemplates
No permission to view TWiki.WebTopBar